The classes went so well! I always love seeing others creations and share in their excitement of what they've made! One of the ladies brought her Mom who was visitng from out of town. Look at these beautiful women with their pieces of art!
My Littlest was also enthralled with the dress form scene making and was playing after the first group of Ladies had gone home. Her wonderful Safari card inspired a couple of the ladies from the next class to recreate it the same!
...and it received further kudos when a visiting Auntie gravitated instantly to it on the banner line! : D
I haven't even started playing with the variations of the pop up itself! Exciting times ahead!
smiles,
Laurie
Tuesday, May 7, 2013
Thursday, May 2, 2013
Patterned Party
Is that a bit ironic that I paired up the Dress Form with the "Pattern"ed Party stamp set...not intentional, just aiming for a bit of 'atmosphere' for these little dress forms.
I was saying to one of my Gals: I'm envisioning a whole big scene and then looking for a couple stamps to depict it. For instance, yesterday's little Tea Party had fancy tables set, tiered plates of cakes and a happy social buzz of conversation...but really, just a couple little tea cups.
This is another card for the classes coming up. Well actually card front, I'm thinking of stringing them all up on a banner to hang in our creative spaces till we need them for a card and then we can just take them off and add a card base.
...and I was going to wait and just post one each day, but I'm not good at that, so here is another card.
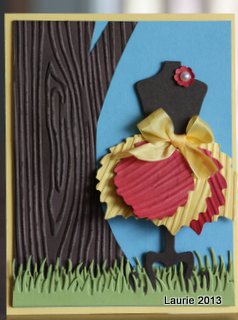
There are so many cards on Pinterest with the great flowers from Pop up Posies kit, so when I went looking for a flower die to use and saw my Autumn Accent Leaves, I thought "a Fall card! And it shows off the diversity of this little dress form as all seasons" (I saw the cutest Mrs Claus card from Fran Sabad the other day)
I hand cut the tree trunk, used the embossing folder then sponged over the piece with ink. I also ran the leaves through the Woodgrain embossing folder for some extra texture.
smiles,
Laurie
This is another card for the classes coming up. Well actually card front, I'm thinking of stringing them all up on a banner to hang in our creative spaces till we need them for a card and then we can just take them off and add a card base.
...and I was going to wait and just post one each day, but I'm not good at that, so here is another card.
There are so many cards on Pinterest with the great flowers from Pop up Posies kit, so when I went looking for a flower die to use and saw my Autumn Accent Leaves, I thought "a Fall card! And it shows off the diversity of this little dress form as all seasons" (I saw the cutest Mrs Claus card from Fran Sabad the other day)
I hand cut the tree trunk, used the embossing folder then sponged over the piece with ink. I also ran the leaves through the Woodgrain embossing folder for some extra texture.
smiles,
Laurie
Wednesday, May 1, 2013
Dress up for a Tea Shoppe Party
I'm getting ready for my next class, playing with a few different styles and colours and maybe a retiring set or two!
So many of the little fun dresses seem to be begging for a Tea party. This one combines the doily (spritzed with some Lucky Limeade), the ruffled ribbon and some Wiseteria Designer paper. This is one of my all-time favourite sayings, found in the fabulous stamp set Tea Shoppe which will be retiring the end of May.
Exciting news around the farm: these fabulous little twin Bison! Born about a week ago and so stinkin' cute. I don't ever remember having twins! They are so little compared to the other baby born just a day or so earlier. I'm so thrilled!
smiles,
Laurie
Sunday, April 28, 2013
Stampin'Up! Designer Rosette Bigz Die and my Big Shot Make some Home Decor
We had a wonderful weekend. The Girl Guides planned a trip to the Calgary Zoo. The Programme included a fabulous late evening walk along the paths of the Canadian Wilds section of the zoo, sleeping in the Cequel lodge, beside the playful otters and an early morning stroll past the grizzlies over to our breakfast in Kitamba Hall, before letting us loose in the zoo for a day of touring.
The weather cooperated which is amazing for April in Alberta and we had a fabulous time!
I am slow getting some ideas prepared for my classes this week, but will be working with the Dress Form and the plethora of ideas that can be imagined with it! Check back in to see what I'm coming up with!
About a month ago, I revamped my entryway alcove with these fun Rosettes from an idea I'd seen on Pinterest. I used the Sizzix Designer Rosette Bigz XL die and cut the scored pieces in several different variations giving me some rosettes with the lovely scalloped edge and some rosettes with the wonderful jagged edge. The largest rosette is full size and uses a centre circle piece that has a 5" diameter. I used hot glue to fasten the rosettes onto the centre pieces, and then decorated them in a variety of styles.
smiles,
Laurie
Wednesday, April 24, 2013
Retiring Lists are Posted
It is that time of year again.
Time to say Goodbye to lots of stamp sets and accessories as we
Welcome in the new products starting May 31st.
Many Retiring Accessories are on sale at 25 - 40%
Remember, all products listed are while supplies last so don't wait to shop!
Some sad goodbyes, some see-you-laters and some better-get-them-now sets have hit the list!
I'm reorganizing my stamp sets and thinking about the class I should be having to share some of my favourite sets with my Gals. Last year I made such a fun sampler using about 9 sets if I remember correctly...what to do this year? Maybe a Stamp a stack to fill up our card boxes for some ready-made cards for those special occasions ahead. Lots of great sets could be used: Morning Cup (ack!), Tiny Tags and the punch (what are they thinking?!) Just Believe, Elements of Style and I haven't even started to look at Christmas sets! Be sure to catch the ones that have been on your Wish Lists.
It's a great time to have a Party, too...Hostesses receive an extra $35 worth of free product with a $400 Party ~ that's $110 worth of FREE product, while having a good time with friends and learning a few tips, tricks and techniques from me.
Grab another cuppa and start looking through the lists. Talk to you soon,
smiles,
Laurie
Monday, April 22, 2013
Button Buddy Snail sets the pace for posting this card...
I always have such high hopes of all the things I'll create and post for you!
...and then another week goes by, and often another!
So, finally, here is one of the cards the Girls made at the re-vamped class for Button Buddies.
Another decoraton I made to surprise her as she came down the morning of her party was this great Mockingjay for the wall. I saw it on Pinterest and the link had a wonderful step by step tutorial for making my own. I used just plain print paper and spritzed it with our Smooch to give it the glimmer and colour.
...and then another week goes by, and often another!
So, finally, here is one of the cards the Girls made at the re-vamped class for Button Buddies.
I saw lots of the 3 snails in a row and thought how fun to use some bright paper from the Summer Smooches DSP and accent with matching coloured buttons! A couple of the gals bettered my sample by using the Real Red button instead of the Razzleberry..and it looked stunning.
It's been a busy week of crafting here while I was busy decorating for my Oldest's Birthday party. She had chosen to do a Hunger Games party theme. Onto the web I went to see how some others chose to add some flair to their party.
I was on for the Feast and decorations, she organized the invites and game plan.
Her invites looked great. She assigned each guest a District to have a costume for the parade. They played with hair, nails and makeup first. After the Parade, we held the "Feast".
I wish I'd have taken a picture of the food laid out, it looked pretty yummy!
This was the Backdrop for the buffet table, a second table to the right held the Desserts, including some "Nightlock berry tarts" and the Birthday cake. Another decoraton I made to surprise her as she came down the morning of her party was this great Mockingjay for the wall. I saw it on Pinterest and the link had a wonderful step by step tutorial for making my own. I used just plain print paper and spritzed it with our Smooch to give it the glimmer and colour.
We all had a great time!
smiles,
Laurie
Tuesday, April 9, 2013
This and That
Your life is: Awesome. Quirky. Exciting. Perfectly messy. And happening really fast. So we're happy to introduce our newest product line that lets you capture it all on-the-go. This and That will debut in the 2013-2014 annual catalog, but we're giving you and everybody else the chance to get it now.
This cute Youtube video has a catchy tune and shares a jazzy preview to this fun new addition.
If you buy it this month you save 15% on a bundle of goodies.
I'm waiting for mine to arrive tomorrow! I'm really excited about all the new stuff Stampin'Up! has included in the Bundle!
smiles,
Laurie
Subscribe to:
Posts (Atom)